Thursday, March 29, 2012

Still Playing With The Powder (And some proof for my friend...)

What's worse than having a sick child?
Having a sick child WHILE you are sick yourself.
What's worse than having a sick child while you are sick yourself?
Having a sick child while you are sick yourself while on SPRING BREAK.
What's worse than having a sick child while you are sick yourself while on SPRING BREAK?
Having a sick child while you are sick yourself while on SPRING BREAK when the weather is absolutely gorgeous and begging for some outdoor time.
Yeah, it's been one of those weeks.
But it could be worse.
I did manage a little play time:
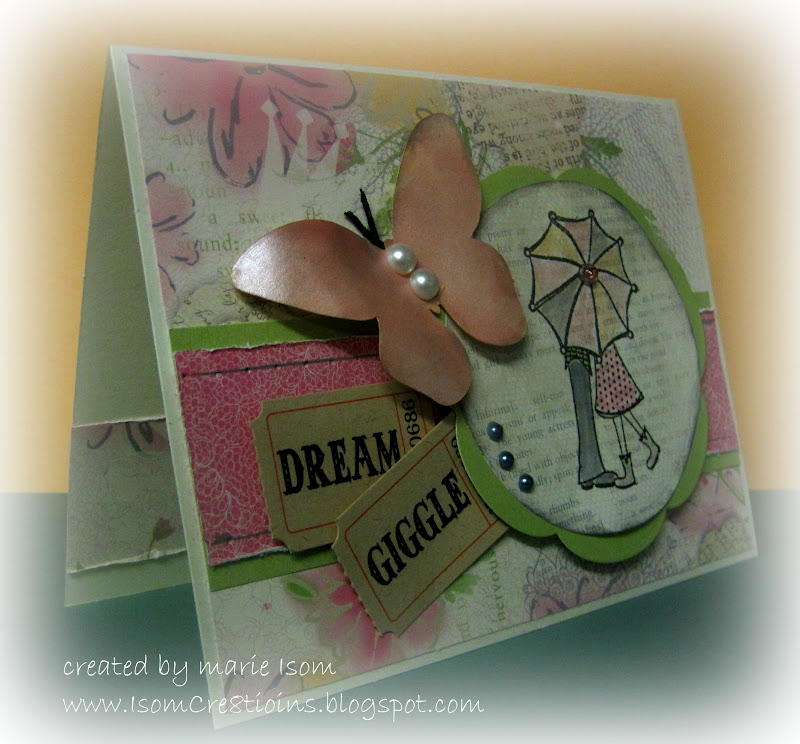
 I once again used embossing powder, distress ink, and background stamps to make some unique background papers.  First, on glossy paper stamp your background stamp with versamark ink then liberally apply powder.  Use embossing tool to heat/set.  When dry, rub distress ink (or anything other than pigment ink. Distress inks give a more subtle color.)  Wipe off excess ink with a rag.  Use second generation stamping to add font. (Second generation stamping means that after you ink up your image, you first stamp on another piece of paper then on your project. It gives a lighter image than "first generation" stamping - stamping directly onto your project.)
 I cut my paper into three pieces and matted on black cardstock, added some die cut flowers and prisma flowers as well as a sentiment.


 Here's another example of home made background and texture paper (or designer paper...you say toe-mae-toe, I say tah-mah-toe...)


Another one of those photos I can't seem to rotate :( 


 I used the same basic technique for creating these die-cut butterflies. It's pretty hard to see int he photo but they are shimmery and have some dimension/texture from the embossing.


Thanks for stopping by!
Marie with a :)

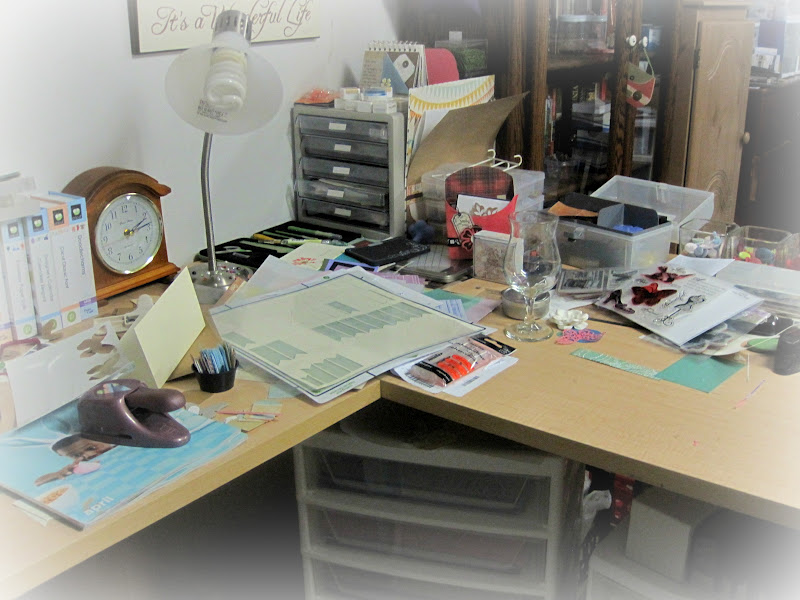
PS I recently overheard a friend telling someone how organized my craft room was. I almost choked on my guacamole.  Here's proof, LeeAnn, that organized I am not:


Monday, March 26, 2012

CAS meets CAS...

Yep, two inspirational challenges: Clean and Simple FTL sketch 183 and CAS-ual Friday, which was to use pastels and black on a CAS card.  Here's my take:

 I once again grabbed the beautiful CTMH "Lucy" paperpack that a precious friend gave me for my birthday.

 I used second generation stamping and a Hero Arts background stamp on the inside of my circle before stamping the sentiment (from one of my oldest stamp sets: Clearly wordsworth/I'm So Glad)

I have had plain chipboard butterflies in one of my drawers for ages. Confession: I'm a lazy crafter, so adhering, cutting and sanding paper to fit the shape of a butterfly never appealed to me. My poor butterflies remained unadorned and unused.Until I realized there's more than one way to cover a butterfly :)  This one was sooooo easy - I just daubed some Tim Holtz worn lipstick distress stain, then sprayed with heirloom gold Perfect Pearls Mist for a bit of shimmer. A quick background stamp over that (before it even dried...I'm not only lazy, I'm impatient :)  ) and a little distress ink on the edges and I was done. Total time was about 5 minutes!

Thanks for stopping by!
Marie with a :)


Friday, March 23, 2012

Embossing Techniques and a Birthday Card

On my Isom Cre8tions facebook page, I have started sharing techniques that I am brushing up on (or learning for the first time) to use during workshops this summer. I thought I'd begin with embossing. My natural tendency is to make techniques work for me with what supplies I have on hand. (From a glance into my craft room, you wouldn't guess there ARE supplies I don't actually have...)  So when I first tried the "trapped emboss" technique, I did it without the recommended glossy cardstock and here is what I came up with:
Notice how there is still ink on the butterfly image in the first tag?  The next day I was at Jamba Juice...and since Archivers is next door, I decided to go ahead and purchase some glossy cardstock. The result:

Notice how cleanly the ink wiped off the clear embossed heart on the second tag? I guess that's why glossy paper is recommended   :/

Another embossing technique is to create your own background paper...and yes, for this one I used glossy paper.  First choose a background stamp and liberally apply versamark ink all over it. Stamp image on (glossy :)  ) cardstock and add a clear OR colored embossing powder. I opted for pewter for this one and used an old Cornish Heritage Farms music background stamp. Then rub distressing ink over the entire thing. Use a cloth to wipe off any excess ink:

It's difficult to show the beauty of embossing in a photo...it adds texture and a little "oomph" to a plain card:


For my card, I used some banners, a flower and tag cut out using the CTMH Art Philosophy Cricut cartridge. I sprayed the banner and flower them with Perfect Pearls and used an old CTMH background stamp for the tag:


And voila:

The finished project :) 

Wishing you a beautiful weekend,
Marie with a :)

PS There is a link to my facebook page on the left hand side of this blog...follow me on FB!


Monday, March 19, 2012

One Sketch, Two Scripture Cards

Yep, I'm using a sketch again.  Not sure how long it's going to take me to feel at home in the craft room again :) Here are two cards using the Mojo Monday Sketch 233 .  Mojo Monday sketches are a longtime favorite, though I haven't participated for a lonnnnggggtime :) The MM design team does absolutely stunning work so be sure to take a peak.


A little parenthetical thought...when I was a CTMH consultant I used to feel twinges of guilt when I'd use another company's stamps and paper...almost like I was cheating on my company!  It's rather freeing to be able to play with the ample supply of other brands of goodies in my craft room now :)  The paper I used was My Mind's Eye (Carefree) and I wish Iwould have purchased more of it!  The stamp sentiments are from Verve and the images are Tim Holtz.  The ribbon is Close To My Heart. The "lace"is from a Stampin' Up punch and the wooden heart...who knows?  It has been in the craft room for eons. 

Thanks for stopping by!
Marie with a :)

Sunday, March 18, 2012

How Did I Get From There to Here? (CPS 257)

It is mid-March 2012 and I have posted a mere three blog posts!  I have lots of projects looming but was feeling a bit rusty, barely able to remember where anything was in the craft room...so I decided to get my feet wet fingers inky by taking a look at the CPS sketch for some inspiration.
Not quite sure how I got from there:


to here:

 I bought this cute stamp image to use in Alyssa and Caleb's guest book since he proposed to her in the rain.  Thought I'd make a few cards before I get started on the guest book.


 This paper is one of the newest from CTMH...isn't it gorgeous???

 (inside of the card)

I have a calendar to get finished this week so hopefully I'll have a bunch more posts in the near future :)
Thanks for stopping by!
Marie with a :)